Halloween is not my holiday, and it never really has been. But, of course, Brandon loves it. Since we've been together, I've been more and more committed to our elaborate costumes.
In 2017, we went as Voldemort and Bellatrix Lestrange. We got up extra early and liquid latex-ed down Brandon's nose, thickened up his brow line, painted his face and did up his make up. My look was much easier. I just did big hair and sprayed it black. It was fun and we won Best Costume at our office.
 |
| Halloween 2017 |
For 2018, we decided to go the retro video game avenue, and decided on Link & Zelda. (I wanted to be Mario and Luigi, but maybe Halloween 2019??)
I wasn't a huge fan of the Zelda costumes available online. They seemed cheap... just too shiny and mass produced. I looked at Etsy for more toned down options, but every piece was/is extremely expensive. They definitely cater to the Cosplay clientele.
So instead of spending hundreds of dollars on our costumes, I spent about a hundred hours or so.
Since Zelda is a princess, the first order of business was making my crown. After the crown was complete, I started working on the belt.
I've never created any of these types of things before, Cosplay armor and whatnot, so I went to Etsy for a template. The template for the Crown and Belt was 10 dollars. I went to Michaels and got sheets of craft foam, some jewels, jump rings and clasps, blue glitter, gold and black acrylic paint, gold spray paint, black felt, and thick gauged wire.
I don't think I had any idea how much time and energy this project would take, but I was excited to make something!
I printed the template, cut out the pieces and started tracing them on the craft foam. Once all the pieces were traced, I cut them out and began painting. Painting craft foam is an arduous process. I first coated each piece with a glue stick and then started paining. Foam is really absorbent, so each piece required 3-4 coats of gold paint.
Once everything was gold, I then "aged" the pieces with some black paint. Then I sprayed everything with the gold paint spray to give a more realistic gold metal appearance.
Below are photos of the crown and belt. I don't have detailed photos of the crown in progress, but please enjoy Brandon's white fedora as my crown holder!
 |
| I couldn't find the right size jewel for the front of the crown, so I improvised with a large round, smaller rounds to create a teardrop shape and then put glitter in the gaps. I had to move the center piece after gluing it. I fixed the paint issue later. |
 |
| Back of the crown |
 |
| Front: I used hot glue to create the leaf veins |
 |
| Back: I painted the pink inside later |
 |
| Belt template pieces cut out, ready to be traced |
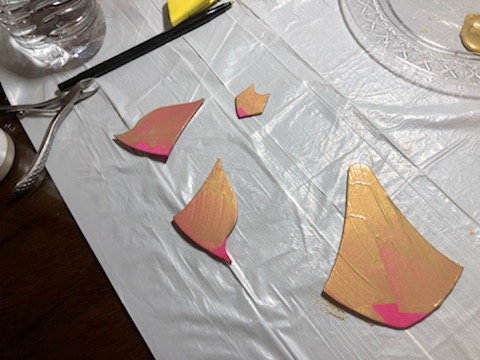 |
| Painting in progress - 2nd or 3rd coat |
 |
| All the belt pieces drying before assembly |
 |
| Assembled! |
 |
| Jump rings and clasps spray painted |
 |
| I put felt strips of felt on the back of each piece to attach the rings |
This is the completed product (you can see I'm painting the inside of the crown here!)
Next order thing on my list was painting and aging some of Brandon's costume. Brandon asked that I paint the hilt of Link's sword and age Brandon's Link shield so it looked more authentic.
Brandon didn't like the blue of the hilt, as it didn't match the blue of the shield.
 |
| Before I started painting |
 |
| In the middle of the painting process - the foam sword was extremely time consuming to paint. It had so many groves and it took forever to dry! |
 |
| Before: Brandon was trying on his things |
 |
| After: Sprayed the shield with watered down gray paint, and then added some black to make it look battle worn |
 |
| My dress, Brandon's boots, wig, gauntlets, and our elf ears are from Amazon Brandon's tunic and hat are from Etsy House is in our neighborhood |
 |
| Our finished product! |


